Keyboard Shortcuts for AppleScripts: An iTunes Power Tip for Mac Users

Note: The behaviors described below are from Mac OS X 10.4.10. Previous versions of the OS might not behave as described. YMMV.

Keyboard shortcuts are the life-blood of the power user. Casual users know of the basic ones: Command-Q to quit, Command-W to close a window, Command-F to find, etc, but the power users have them all memorized for every program they use. For them, actions that would take 3-5 seconds of arduous mouse work can be accomplished in as little as half a second of keyboarding. That’s up to a 10x increase in productivity! Heck, many individuals, myself included, can go for minutes without even touching the mouse.

But even the most vaunted power user might not know this trick.

Mac OS X (both Panther and Tiger) has a little-promoted feature that lets you customize some of those keyboard shortcuts for menu items. Even some global commands can be changed to suit your tastes. Don’t like Command-P to Print? Change it. You can even make it an F-Key and return some functionality to your keyboard’s top row. In some cases, you can give shortcuts to menu items that don’t have one.

There are some caveats however:

  • When entering your new keyboard shortcut, you must make sure you type the Menu Item exactly as it appears in the Menu. Same spelling, capitalization and punctuation. Many menu commands end with an ellipsis, which you can type by pressing Option-; (semi-colon).
  • Also, if you choose a key combo that already exists, in most cases, the new one will replace the old one, leaving the original without a shortcut. Some programs will assign the duplicate shortcut, but it just won’t work.
  • Finally, there are apps that will not be affected by the changes you make. Photoshop, for one, uses its own internal shortcut customization scheme and won’t recognize anything you change in System Preferences.

So, having said all that, let’s apply it to iTunes.

The Macintosh version of iTunes, as you may well know, can extend its capabilities via AppleScripts, those little bundles of code that help with repetitive tasks, make organizing easier and add new features. A new Scripts Menu will appear in the Menu Bar when AppleScripts are installed script menu. If you’re reading an article on how to add a keyboard shortcut to them, you probably already know this. The beauty is that the system treats the Scripts Menu just like any other and you can add a keyboard shortcut to any script you have installed.

Identify Scripts
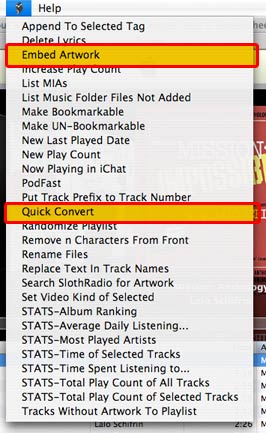
The Scripts Menu before

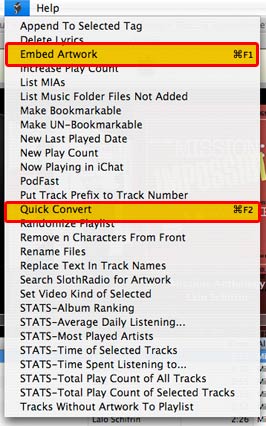
Start by opening iTunes. Click on the Scripts Menu and determine which scripts you want to add shortcuts to. Note their names as they appear in the drop-down. For this example, I’m selecting a Script called Embed Artwork. It copies album art downloaded from the iTunes Store into the individual music files; iTunes doesn’t do that by default, so I end up using it pretty frequently. I’ll also do Quick Convert, since I often use it to convert podcasts into audiobooks for faster listening.

Apply the Shortcuts
adding keyboard shortcuts to itunes

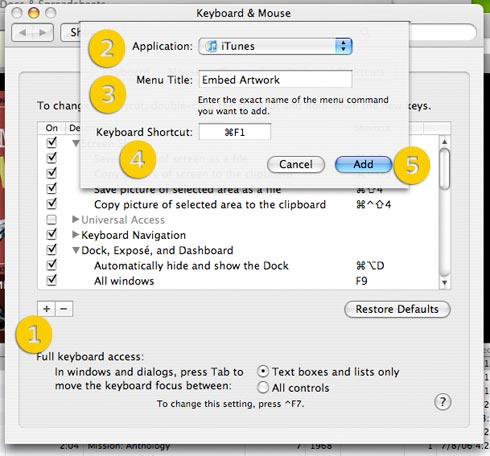
Open System Preferences. Select Keyboard & Mouse, then Keyboard Shortcuts. Click the + (plus) sign in the lower left, then select iTunes from the Applications pop-up. In the Menu Title field, enter the name of the script. In the Keyboard Shortcut field, press the key combo you wish to use. For Embed Artwork, I’m choosing Command-F1, Quick Convert gets Command-F2. A modifier key is required in iTunes. Stand-alone F-Keys, for whatever reason, will show up in the menu but they won’t do anything when pressed. When you’re satisfied, press Add to save.

Relaunch iTunes
The Scripts Menu after editing keyboard shortcuts

iTunes loads the keyboard shortcuts when it is launched, so quit and reopen it. When you click the Scripts Menu, you’ll see your new shortcuts displayed next to your script titles.

It is important to remember that configuring keyboard shortcuts, in general, is an inexact process. If something doesn’t work, find an alternative. I know I would love to use those F-Keys in iTunes. but for now, I’ll have to settle for the workaround. Still, these added functions will be a boon to anyone’s productivity.
iTunes Report: High Impact Artists

I’ve spent the past couple days playing around with Alex King’s iTunes Stats program. It’s written in PHP/MYSQL and requires a web server to run. With the MAMP one-click server running on my PowerBook, I had little trouble installing the program (though I did have to substantially increase the PHP timeout setting so it could handle my large library).

iTunes Stats reads XML files, one can load an entire iTunes library or export playlists for more selective examinations.

The program also comes with a number of built-in reports, such as Most Played Albums, Most Played Artists. Top Rated Albums/Artists and the option to weight by number of rated songs and play counts. The engine supports adding custom reports, so if you are motivated enough, you can create new methods of analyzing your music.

My PHPMYSQL-fu is not very strong virtually non-existent. Still, I was able to cobble together my own metric: Artist Impact.

An Artist’s Impact is measured by the total number of play counts they have received divided by the number of songs that artist has in the library. For example, Artist A has 20 songs in the library and those 20 songs have been played a total of 100 times. Thus, 100/20 = 5. That’s Artist A’s Impact. Basically, it tells you, the avergage number of times a song by that artist has been played.

This formula is a way to compensate for the bias present when some artists have significantly more tracks than others. In my case, I have 329 songs by film composer Jerry Goldsmith. He has an inherent advantage over say, The Breeders, who have 63 songs in my library. By virtue of being so prolific, Jerry is naturally going to have more play counts.

After playing around with it a bit, I’ve made some interesting observations. Firstly, the top 21 most impactful artists in my library, with one exception, have only one or two songs. In cases where an artist has a low number of songs, each play count is “worth more” in relation to other artists. A single play by an artist with only one song nets that artist a full “point,” whereas as single play by an artist with 20 songs would only gain .05 points.

Fortunately, I’m able to set a threshold for display, keeping outliers from being counted. Here’s my top ten High Impact Artists. The artist must have at least five songs in my library. Additionally, this list only takes into account “popular music” (excludes classical, live shows and film/tv scores).

Artist # of Songs Plays Impact
(avg plays / song)
1 Jet 7 73 10.4286
2 Rilo Kiley 55 512 9.3091
3 Glitter Mini 9 7 65 9.2857
4 National Skyline 10 92 9.2000
5 The Strokes 47 426 9.0638
6 String Theory 5 38 7.6000
7 Mercury Rev 34 257 7.5588
8 mouse on mars 154 1116 7.2468
9 Cex 37 264 7.1351
10 Bran Van 3000 34 228 6.7059

I’m very surprised to see Jet in the number one spot. That’s because my affinity for the band has waned to virtually nil. Still, it’s hard to argue with the dent Are You Gonna Be My Girl? made in my listening habits back in ’03. The ironic part is that overall, I didn’t care for Get Born, so I ended up deleting five of the thirteen songs on the album. Those weaker songs aren’t there to dilute Jet’s Impact by lowering the ratio of play counts to songs, so the band’s number seems artificially inflated.

Overall, I’m having quite the enjoyable time playing with iTunes Stats, even though it’s a little rough around the edges. I’m working on a couple of new reports and have even figured out how to get it to tell me which albums are missing ratings and how many ratings need to be completed.

Fun times ahead!

Pioneer DVR-107D DVD burner + Max = Perfect encoding solution

Recently, I’ve taken to re-encoding some of my favorite CDs, mostly ones that I originally encoded long ago, some as far back as 1999. Hard drive space was at a premium at the time, so I traded acceptable losses in quality for a smaller storage footprint. When the music is coming from a beige G3’s internal speaker, 112 kbps and 320 kbps mp3s sound basically the same.

But as I’ve gotten older and I’ve been able to afford audio equipment with higher fidelity, the flaws in those original files have become ever more noticeable.

Since hard drive space isn’t much of a problem these days, I’m endeavoring to upgrade all those ancient files to modern quality standards. As I run across those sub-par album rips during my daily listening routine, I’m replacing them with 256 kbps VBR AAC files or Apple Lossless (if they are deserving of the extra attention to detail).

Max Icon

And so was this situation that occurred last week when listening to Velocity Girl’s ¡Simpatico!, one of my all-time favorite albums. The music sounded “off” and it reminded me that I’ve been meaning to create a new encoding for a long time. I grabbed the disc off the shelf, fired up Max, the handiest freeware audio converter/ripper/encoder available for Mac OS X, and set it to work.

But it did not take long for an anticipated problem to rear its head. The seventh song on the disc, Rubble, has had a pretty nasty scratch for I don’t know how long, a scratch that marred the original file years ago. As I feared, the encoding process stalled, so I canceled it. I’ve known my iMac’s built-in Matshita UJ-846 drive to be problematic with flaky discs, frequently getting hung up on them, so I pulled out my external Pioneer DVR-107D and hooked it up via Firewire.

The DVR107D was one of the first DVD burners available for less than $100 and I got one to use with my G4 iMac, which couldn’t even read DVDs, much less write them. I crammed the drive into an old LaCie case I had and, let me tell you, this thing has performed like a champ for the entirety of my ownership. It has read every disc I’ve put into it. And recently, it allowed me to consolidate some old, and I mean old, CD-Rs onto DVD when the built-in drive balked at them.

So I slipped my CD into the Pioneer and resumed my encoding task. No hang-ups whatsoever. But the thing that blew me away, and I have Max to thank for this, was that when I listened to the new song, all traces of the disc damage were gone.

It turns out that Max leverages the power of an obscure CD audio extraction tool called cdparanoia which uses “high-level error-correction” to resuscitate heavily flawed discs, and completely compensate for scratches on CDs.

Combined with Pioneer’s hardware, Max turns out perfectly encoded songs. Just give it a listen. The following are from multiple encodings excerpted from the damaged section of Rubble from my Velocity Girl CD:

This first sample was encoded to 128kbps AAC/M4A by iTunes 4.7 using the built-in CD drive on the iMac G4 I owned two years ago. The glitches on the disc is quite prominent:

[audio:http://www.tunequest.org/matrix/uploads/2007/06/rubble-original128kbps.mp3]

This file, however, is golden. It was encoded to Apple Lossless by Max using the Pioneer DVR-107D. Pristine; nary a hint of trouble:

[audio:http://www.tunequest.org/matrix/uploads/2007/06/rubble-pioneer-max.mp3]

Frankly, I’m amazed by the results. Max + Pioneer makes for a seriously perfect encoding solution.

The DVR-107D shipped as the standard optical drive in some (but not all) of the PowerMac G5 towers, so you may already have one. If not, at the time of this writing, Other World Computing has its descendant, the DVR-112D for less than $50.

Even if you don’t have access to the drive itself, download Max. It’ll go a long way toward creating higher-quality files.

::

PS: Google Docs, which I use to store drafts for this site and other correspondences, now works with the new Safari 3 beta from Apple. This post was written using the combo and it’s nice to have my familiar Mac OS Services, integration and text and keyboard handling at my disposal.

Playgrounds: Fun and interesting applications of Last.fm’s technology

The vast array of listening information available at Last.fm probably had a great deal to do with CBS’s decision to purchase the company. Though I’m wary of the deal, I’ve not lost all hope for the site. The Audioscrobbler technology behind it is some pretty fascinating stuff and the data it collects is open and available be analyzed, interpreted, shared and displayed in a lot of diverse applications.

Hopefully, now that CBS’s hand is in the cookie jar, this aspect of the service won’t change. As long as the data is accessible, here’s a number of cool things that can be harvested from Last.fm.

LastGraph

last.fm waveform 2007

My waveform for 2007, through the beginning of June.

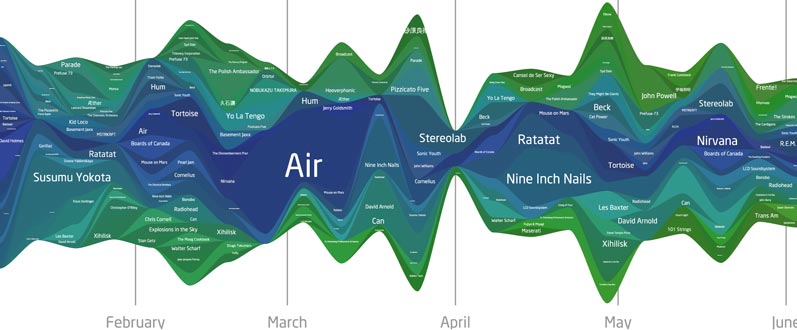
Lee Byron’s work on Last.fm data visualization made a fairly large splash on the net recently. The multi-colored waveforms showed undulating music tastes as artists’ popularity expands and contracts over time. It’s fascinating stuff.

And of course, after a moment of exclaiming "cool!" and "pretty!" the question on everyone’s mind was "How do I get one for myself?" Since Byron’s page was more of a demonstration and proof-of-concept, there was no way for someone to enter their username and get a graph of their own listening habits, leaving many visitors disgruntled.

Enter LastGraph, which does what all those disgruntled users were requesting, for whatever username you want. Results are offered in PDF and SVG formats, which are vector based, so you can zoom very close to see small-scale changes in data. The only thing that’s missing is the ability to track an individual artist within the ebb and flow of your listening. Specifically, I’d like to hover over a line and see that artist’s trends highlighted. That’s not going to happen with a PDF though. Oh well.

The site is running kinda bare-bones right now and there is a queue system in place. You may have to wait several hours before your PDF is ready to download. So be patient. It’s worth it. The site’s performance has much improved since it launched.

Also note: the PDFs produced by the site do not render in Mac OS X’s Preview app, so be sure to view them in Acrobat.

Musicmapper’s Last.fm in Time


This chart shows my listening habits during the past 121 weeks (roughly the beginning of March 2005). Click to see larger.

Musicmapper’s Last.fm in Time generates a single graphic that displays a variety of data. The bar graphs in the background represents the total of each weeks play counts. Your top 50 artists are displayed, in rank order, on the right. The line graphs show how each of the top 50 have grown over time.

This can be useful for determining trends in your tastes and habits. In my case, before the 52 week mark, I see a lot flat-lined activity, especially among my top ten, that suddenly takes off. Also, I notice that Susuma Yakota, who I had never heard of before January this year, is in my top 50 and that he got there rather quickly. There is a very steep curve for him starting 23 weeks ago.

Tuneglue relationship explorer


Click for full size.

Tuneglue creates a web of related bands and artists. Start with one artist or band, expand the results to find similar artists or bands, then do the same to those. With four or five clicks, you’ll have a large interconnected web of new bands to explore based on similarities and relationships to your tastes. It’s a neat visual metaphor of musical interest and a good jumping off point for new music recommendations. The lack of sound samples limits its usefulness as an exploratiom tool, though the map is still fun to play with.

One killer app of the site, however, is missing. I talk of course, about a "six degrees" linker. It would be very cool to input two artists and see how many jumps are necessary to connect to two. For example, it takes four jumps to connect Mogwai to the Strokes (Mogwai » Radiohead » The Beatles » The White Stripes » The Strokes, according to Tuneglue). I figured that out on my own, but it would be nice of the site to do it for me.

Last.fm tools by Anthony Liekens

cloud of recommendations

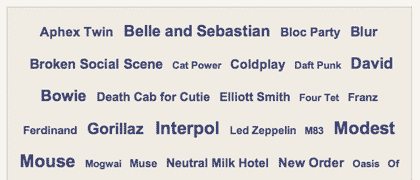
This site features a number of Last.fm related tools. My favorite is the artist recommendation cloud, which generates a number of suggestions for musical exploration based on your top artists. Higher recommendations appear at a larger type size. Recommendations can be based on stats from your overall list, the past 12, 6 or 3 months or the past week.

Also be sure to check out your eclectic rating. I scored an 80 out of 100.

How compatible are your tastes with a radio station?

sekrit

Last.fm user profile bbc6music is, you guessed it, created by the songs BBC Radio 6 (6music) plays on air. Though not every song that the station broadcast gets uploaded to Last.fm, the user profile still manages to add about 100 play counts per day. As of August 2011, the station has an accumulated track count of nearly 380,000. The most played artist is David Bowie.

Mainstream-o-Meter

mainstreamnes

Finally, there’s the Mainstream-o-Meter, which compares your top stats with the overall most played artists site-wide. Each of your most-listened-to artists are given a weighted score which is then used to calculate your overall "mainstreamness."

::

Last.fm is certainly a vast treasure trove of information, so hop to it and get exploring.

Magnetosphere: Awesome iTunes Visualizer

One of the lesser-used features of iTunes is its visualizer, the colorful animated display that accompanies any music that’s playing. The visuals are a fun little distraction, but once the novelty wears off, the usefulness of the function tends to be limited. Though, in college, a PowerBook and an LCD projector made for a pretty rockin portable party system.

g-force shot
Ol’ trusty G-Force

iTunes, from version 1.0, has shipped with a default visualizer: G-Force, which was originally a plugin for SoundJam (the app that iTunes was initially derived from). It was groundbreaking at the time of its release and it still has some appeal, but at seven years old with no major updates, the plugin shows its age.

Enter Magnetosphere, a brand-new visualizer that was recently released as a beta. It’s not the first third-party visualizer, but it is the best one I’ve seen yet.

Magnetosphere features excellent music response, smooth animation (even on my aging G4 PowerBook), a variety of visual themes, and best of all, lots of pretty colors. One could stare at it for hours (assuming they have nothing productive to be doing with their time) and I’m even tempted to throw a party just to show it off.

This thing is awesome, but don’t take my word for it. Here’s a video I made of it in action:

Magnetosphere, iTunes plugin, in action

The best part starts around 1:50, but really, just watch the whole thing. And if at all you’re curious, the song is Nostrand, the sleeper hit from Ratatat’s Classics.

Download Magnetosphere from Barbarian Software. Mac OS X and Windows versions available. Requires iTunes of course.

Update 5 Sept 08: There’s a rumor going around that the Magnetosphere visualizer will be included with the also-rumored iTunes 8, which itself is rumored to be released mid-September 2008.

Update 9 Sept 08: Yep, looks like the rumor mill had it right. Magenetosphere is now a part of iTunes by default, as of version 8, which is available for download from Apple.

What’s in a star rating?

Yesterday, I wrote a detailed article about the new formula I’m using to quantify the overall quality of albums in my iTunes library. It’s been working for me, but I realized that everyone rates their music differently. Webomatica, for example, explains in the comments that his song ratings are relative to other songs by the same artist.

So I’d like to explain the thought process that goes into my rating system. I’ve been using the same star rating criteria for years and that system has gone a long way toward helping me maintain control over my sprawling library. It allows me to quickly construct playlists of quality music, which is the single largest goal I have when managing and utilizing my library.

When thinking about a song’s rating, I basically need it answer one question: How likely I am to want to hear this song again? They are not designed to attribute a greater cultural value to a song, though the song’s general artistic worth plays a large role in the rating it receives. I’m more likely to enjoy a high-quality song and thus want to listen to it more often.

The rating is essentially a weighted vote for helping me determine how often a particular song gets played in the future. The breakdown looks like this:

  • Rating: ★★★★★ 5 stars: This song is excellent. It shows poise and craftsmanship and I’m pretty much guaranteed to enjoy this one the next time.
  • Rating: ★★★★☆ 4 stars: This song is very good. Well done and not off-putting, I’ll most likely enjoy this again, but it’s not brilliant enough to be a 5. The majority of songs in my library fall into this rating.
  • Rating: ★★★☆☆ 3 stars: This song is good. I’m not going to go out of my way to hear this one, but if I’m listening to an album beginning-to-end, I won’t skip it.
  • Rating: ★★☆☆☆ 2 stars: This song wasn’t very good. I’m fairly certain I’ll never want to hear it again. These songs are candidates for deletion. If any song stays at 2 stars for long enough, it is either upgraded to 3 stars or removed from the library.
  • Rating: ★☆☆☆☆ 1 star: Not used for rating purposes. Instead, songs that are marked with 1 star are taken out of circulation, usually because of encoding problems or bad ID3 tags. Its normal rating is returned when the problem is solved. Additionally, special audio such as comedy or spoken word is automatically given 1 star to keep it from mingling with music.
  • It is also worth noting that my ratings are not static. As my tastes fluctuate, I’ve been known to change them. It doesn’t happen often, but sometimes a 4 star song might become a 5. Or it could fall to a 3 if whatever aspect of the song I found appealing the last time I heard it is missing. In one extreme example, a song went from 5 to 2 stars and was subsequently deleted.

    There you have it. That’s where I’m coming from as I discuss song and album ratings on this site. I’d be interested to know how other people handle ratings in their iTunes libraries?

    Speeding up Podcasts part 2:
    Using Audacity to speed up MP3s

    Part of the Faster Podcasts Series

    1. Speeding up podcasts:
      Listen to more, faster – Part 1
    2. Speeding up Podcasts part 2:
      Using Audacity to speed up MP3s
    3. Speeding Up Podcasts part 3: Make Yourself an Audiobook

    faster podcast

    I established in the previous article that with all the interesting content out there, it can be quite daunting to listen to all those great podcasts. The ease with which iTunes lets you discover, subscribe to and manage podcasts can quickly lead to an overwhelming number of episodes and timespan to get through. "Podcast Overload" is a very real possibility.

    I also noted in that article that Apple’s Quicktime Player application can be used for faster playback… if you happen to be sitting at a computer. But what if you want to take advantage of the "pod" part of a "podcast" and listen on-the-go?

    Luckily for us all, there are a couple of ways to speed up your spoken word audio before you pack it up and take it with you. Specifically, there are two main approaches, and each has its advantages and weaknesses. The first method involves using an audio processing program to decrease the total running time of a podcast before copying it to your iPod. Alternately, if you have an appropriate model (4G and later or any Nano), you can format your files so that the iPod itself adjusts the playback speed in real-time.

    This approach has two principal advantages:

    1. Flexibility: Audio processing gives you the greatest amount of control over the final playback speed of your podcasts. Speed it up by 10% or 200%, whatever works for you.
    2. Organization: Because you are editing and replacing the original downloaded podcasts, you can maintain the organizational functionality present in iTunes + iPod.

    However, this approach comes with trade-offs:

    1. Processing time. Running an audio file through a sound editor takes time. If you want to increase the playback speed, you have to run it through the processor before dropping it onto your iPod.
    2. Potential Zero-sum changes. Whether a project is even worth attempting depends on the likelihood of a net gain in time. If it takes you 5 minutes of computer use + processing time to shorten audio by 4 minutes, then you would have been better off just listening to it in the first place. This consideration is increasingly relevant for older computers with slower CPU speeds and longer processing times.
    3. Inflexibility. Ironically, the other disadvantage of this approach is inflexibility. Once you’ve processed the file, you’re stuck with it. If you’ve happened to set the speed to a rate that is uncomfortable or impossible to listen to, then you’ll probably have to re-download the podcast and try again.

    audacity icon

    Bearing all that in mind, just how does one speed up a podcast? Easy: Audacity, an open-source audio program that’s packed with features, cross-platform, fairly simple to use, and of course, free. In fact, the program is most likely used in the actual production of many of the podcasts you’ll be modifying.

    Additionally, you’ll need the LAME mp3 encoder to save your processed files back to mp3 after Audacity is finished with them.

    Audacity also supports batch processing (called "Chains" in its parlance) that allows you to open multiple files, run filters, and save back to mp3 with just a couple of clicks. Not bad, but how’s it work with iTunes?

    In basic form, the workflow looks like this:

    1. Podcast is downloaded. MP3 file is saved into your iTunes Music > Podcast folder and the appropriate entry appears in iTunes’ Podcast panel.
    2. Said mp3 file is opened in Audacity. Modifications are made.
    3. New, faster mp3 file is exported.
    4. Original mp3 is replaced.
    5. iTunes entry is updated with a shorter playing time.
    6. Profit?

    Alright, now that we know what we’re in for, let’s walk through the procedure.

    Install and Configure Audacity with LAME mp3 encoder


    click to enlarge

    Download Audacity and LAME encoder for your system. Version 1.3 (beta) is required for batch/chain processing.

    Now to configure.

    Once Audacity is installed, we need to tell it where the LAME encoder is. So, launch the program and select the Preference menu item. Under the file formats section, choose "Find Library" next to MP3 Export Setup. Also, choose the bitrate to save your modified podcasts at. Most podcasts are published between 64kbps and 128kbps. In my experience, 64kbps provides sufficient quality for listening to spoken word, though you should adjust it to fit your preference.

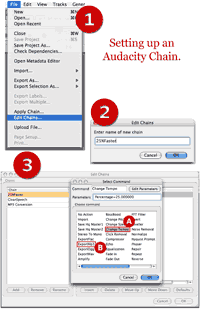
    Next, we just need to set up a Chain. Chains are like scripts inside Audacity that automate a string of operations. For our purpose, we need to build a chain that imports the mp3, changes the tempo, and re-encodes it back to mp3. It’s really easy, so let’s get it set up.


    click to enlarge
    1. From the File menu, select "Edit Chains." You’ll be presented with a box showing the pre-configured Chains.
    2. Click "Add" and give the Chain a name (ex: 25%Faster)
    3. Then click "Insert" to add a step to the process. You don’t need to tell the Chain to import a file. That happens automatically when you run it. So the first thing to do is select "Change Tempo" not Change Speed. Change Speed will affect the pitch of the audio, like speeding up a cassette tape or turntable (aka "chipmunking"). Change Tempo leaves the pitch as it is.
    4. In the Parameters field, enter to amount to speed up by. 20% will result in 48 seconds for every 60. 200% will result in 30 seconds for every 60.
    5. Next, click Insert again and select "ExportMP3." That will complete the Chain.
    6. At this point, you can create multiple Chains for different speeds if you want. One for 15%. One for 50%, etc. When you’re done, close the Chains window.

    Two steps, that’s it. Change tempo -> ExportMP3.

    Let’s Get Speedin’

    Now that Audacity is all set up, we can do the actual processing.

    1. From the File menu, select "Apply Chain" and select the one you created earlier. Click "Apply to files."
    2. Navigate to where your podcast files are stored. Unless you’ve changed your iTunes settings, they’ll be in your "iTunes Music" folder, in a folder called "Podcasts."
    3. Select the files you want to speed up. On a Mac, hold down the Command/Apple key to select more than one file. On Windows, use the Control key.
    4. Click "Open." Audacity will begin processing the files. When it’s finished, you’ll see a folder called "cleaned" with your originally downloaded files. Inside that folder is your shiny new faster podcasts.
    5. Move the new files out of the "cleaned" folder. When asked if you want to over-write the existing files, say yes.
      IMPORTANT: If you want the option of re-processing the files at a different rate, copy or duplicate (don’t just move) them to another folder before replacing.
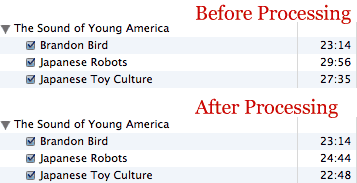
    6. Open iTunes and click on Podcasts from the source view. Select the episode that you modified. The time should change, but if it doesn’t, get info on it. That will force iTunes to refresh the display.

    podcast before and after

    Ta-da. Welcome to the world of faster podcast listening. The next time your iPod is updated, the new faster podcasts will be copied and you can take them on the road.