The $200 terabyte has arrived

western digital my book

A couple months ago, I wrote about the advantages of maintaining a large digital music library, specifically with regards to cost and storage as compared to maintaining a large physical music library. One of my points was that the decreasing prices of hard drives makes it increasingly easy to store, as well as backup large quantities of high-quality music.

I even went so far as to say that “before too long” we’d see the $200 terabyte, which is roughly enough storage for 80 continuous days of lossless quality music plus a complete backup of it all.

Well, that day has arrived. OfficeDepot currently is listing a Western Digital My Book 500GB for $99 after mail-in rebate.

At that price, you might as well get two and secure all your digital media.

Tagging Remix and DJ Albums for iTunes and iPod

Remix albums and DJ albums have always proved a challenge to tag in a useful and logical manner because of how they differ from the traditional song-artist-album tagging model. Like compilations, remix albums typically include songs by a variety of artists and musicians. But they are released under the banner of a single artist and it is that artist that I associate that album with. For example, the album Brazilification has tracks by 18 different artists, all remixed by Fila Brazilia. Most, if not all the songs had been published before on each of the remixed artist’s own records or singles, but Brazilification collects them all and releases them under Fila Brazilia.

Oh what to do, what to do? The standard tagging fields don’t offer a clean way to deal with remix albums, so I’ve had to cobble together my own solutions. The methods I use have to be simple and straightforward to use on an iPod, whose navigation options is more limited than iTunes, but it also has to include all the pertinent information, song name including remix title, remixer, original artist and the album (plus genre and year).

Below are the two approaches I’ve developed. Neither one has really worked to my 100% satisfaction, though.

Method One: Remixer as Artist

This scheme is the more predominate one in my library. I’ve been using it for a long time, but have never been that happy with it. In a sense, the remixer is treated as though they have created a cover version of the original.

Artist Tag

Iin my mind, I associate the remixer/dj as the primary artist. It does have their name on the album cover after all. Thus, using the example above, Fila Brazillia is listed in the Artist field.

Album tag

The album tag, of course, is the album name.

Song Title

There’s no easy way to account for, identify and display the originating artist when the remixer is using the Artist field, so they are added to the beginning of the song name using this syntax:

Radiohead: Climbing Up the Walls

This way, I can easily navigate to the album on my iPod, glance at the track listings and see both the original artist and the song title.

Composer Tag

To make locating remixes in general easier, using my Composer tag guidelines, I identify the original artist again in the Composer tag, but surrounded by parentheses to separate them from actual composers.

Problems

This approach doesn’t work semantically. It puts inappropriate data in inappropriate fields in order to make the system function. To continue with the example above, song is technically titled Climbing Up The Walls (Fila Brazillia Mix) and the actual artist is Radiohead. If I had a copy of Radiohead’s Karma Police single, where the remix originally appeared, Radiohead would, quite properly, receive the artist tag.

Also, The scheme doesn’t play nice when my iTunes library interfaces with third-party applications. The song above is submitted to Last.fm as Fila Brazillia – Radiohead: Climbing Up the Wall, which acheives a disservice for both artists. On the site, it pollutes Fila Brazillia’s database of songs and at the same time, doesn’t provide proper credit to Radiohead.

Because the Artist tag has been misappropriated, this contorted design can interfere with statistics. And anyone who’s spent time around here knows that when it comes to my iTunes library I’m a statistics nut.


Brazilification using this first method. click to enlarge.

Additionally, I find it redundant to enter the original artist in two different places. I’ve been relatively unhappy with the scheme, so I recently began to explore other options.

Method Two: Remixer as “Composer”

One idea I’ve been toying with is swapping the Artist and Composer tags in the above scheme. Thus:

Artist Tag

The original artist name. (Ex. Radiohead). Gives appropriate credit source artists and allows them to be included in Smart Playlists that factor artists.

Compilation tag

Under this configuration, there would be multiple artists on the album, so the Compliation check box must be checked.

Album Tag

Takes the form of Remixer/DJ: Album Name (ex: Fila Brazillia: Brazilification). For easy identification when browsing. However, it does present another semantic problem in that it offers more information the album’s actual name. So the remixer could be left out. I’ll have to see how it works in practice.

Song Name

Song name (remix) (ex: Climbing Up the Walls (Fila Brazillia Mix). It’s only appropriate to give each song its appropriate name.

Composer

The remixer, again surrounded by paranthasese to keep it separated and sorted from actual composers.

Instinctively, I like this design. I’ve not really had a chance to implement it on a large scale, but it holds potential to address the concerns I have with my current scheme.

Yes, it still has some redundancy, with the remixer listed both in the song name, album title and composer tag. However, with direct compilation support on newer model iPods, the use of the remixer in the album or composer tag could be omitted.

Using the Album Artist tag to identify the remixer/dj would actually solve all the problems with this plan. But the iPod’s current lack of support for the field leaves me having to use these workarounds. Let’s hope that Apple adds that increased functionality soon.

In any case, this new tagging format promises to make it rather easy to locate and identify all the songs, artists and remixers in both iTunes and the iPod. It also will work with Last.fm submissions and sorts everything nicely for my all-important statistics.


Brazilification using this second method. click to enlarge

What’s in a star rating?

Yesterday, I wrote a detailed article about the new formula I’m using to quantify the overall quality of albums in my iTunes library. It’s been working for me, but I realized that everyone rates their music differently. Webomatica, for example, explains in the comments that his song ratings are relative to other songs by the same artist.

So I’d like to explain the thought process that goes into my rating system. I’ve been using the same star rating criteria for years and that system has gone a long way toward helping me maintain control over my sprawling library. It allows me to quickly construct playlists of quality music, which is the single largest goal I have when managing and utilizing my library.

When thinking about a song’s rating, I basically need it answer one question: How likely I am to want to hear this song again? They are not designed to attribute a greater cultural value to a song, though the song’s general artistic worth plays a large role in the rating it receives. I’m more likely to enjoy a high-quality song and thus want to listen to it more often.

The rating is essentially a weighted vote for helping me determine how often a particular song gets played in the future. The breakdown looks like this:

  • Rating: ★★★★★ 5 stars: This song is excellent. It shows poise and craftsmanship and I’m pretty much guaranteed to enjoy this one the next time.
  • Rating: ★★★★☆ 4 stars: This song is very good. Well done and not off-putting, I’ll most likely enjoy this again, but it’s not brilliant enough to be a 5. The majority of songs in my library fall into this rating.
  • Rating: ★★★☆☆ 3 stars: This song is good. I’m not going to go out of my way to hear this one, but if I’m listening to an album beginning-to-end, I won’t skip it.
  • Rating: ★★☆☆☆ 2 stars: This song wasn’t very good. I’m fairly certain I’ll never want to hear it again. These songs are candidates for deletion. If any song stays at 2 stars for long enough, it is either upgraded to 3 stars or removed from the library.
  • Rating: ★☆☆☆☆ 1 star: Not used for rating purposes. Instead, songs that are marked with 1 star are taken out of circulation, usually because of encoding problems or bad ID3 tags. Its normal rating is returned when the problem is solved. Additionally, special audio such as comedy or spoken word is automatically given 1 star to keep it from mingling with music.
  • It is also worth noting that my ratings are not static. As my tastes fluctuate, I’ve been known to change them. It doesn’t happen often, but sometimes a 4 star song might become a 5. Or it could fall to a 3 if whatever aspect of the song I found appealing the last time I heard it is missing. In one extreme example, a song went from 5 to 2 stars and was subsequently deleted.

    There you have it. That’s where I’m coming from as I discuss song and album ratings on this site. I’d be interested to know how other people handle ratings in their iTunes libraries?

    Speeding up Podcasts part 2:
    Using Audacity to speed up MP3s

    Part of the Faster Podcasts Series

    1. Speeding up podcasts:
      Listen to more, faster – Part 1
    2. Speeding up Podcasts part 2:
      Using Audacity to speed up MP3s
    3. Speeding Up Podcasts part 3: Make Yourself an Audiobook

    faster podcast

    I established in the previous article that with all the interesting content out there, it can be quite daunting to listen to all those great podcasts. The ease with which iTunes lets you discover, subscribe to and manage podcasts can quickly lead to an overwhelming number of episodes and timespan to get through. "Podcast Overload" is a very real possibility.

    I also noted in that article that Apple’s Quicktime Player application can be used for faster playback… if you happen to be sitting at a computer. But what if you want to take advantage of the "pod" part of a "podcast" and listen on-the-go?

    Luckily for us all, there are a couple of ways to speed up your spoken word audio before you pack it up and take it with you. Specifically, there are two main approaches, and each has its advantages and weaknesses. The first method involves using an audio processing program to decrease the total running time of a podcast before copying it to your iPod. Alternately, if you have an appropriate model (4G and later or any Nano), you can format your files so that the iPod itself adjusts the playback speed in real-time.

    This approach has two principal advantages:

    1. Flexibility: Audio processing gives you the greatest amount of control over the final playback speed of your podcasts. Speed it up by 10% or 200%, whatever works for you.
    2. Organization: Because you are editing and replacing the original downloaded podcasts, you can maintain the organizational functionality present in iTunes + iPod.

    However, this approach comes with trade-offs:

    1. Processing time. Running an audio file through a sound editor takes time. If you want to increase the playback speed, you have to run it through the processor before dropping it onto your iPod.
    2. Potential Zero-sum changes. Whether a project is even worth attempting depends on the likelihood of a net gain in time. If it takes you 5 minutes of computer use + processing time to shorten audio by 4 minutes, then you would have been better off just listening to it in the first place. This consideration is increasingly relevant for older computers with slower CPU speeds and longer processing times.
    3. Inflexibility. Ironically, the other disadvantage of this approach is inflexibility. Once you’ve processed the file, you’re stuck with it. If you’ve happened to set the speed to a rate that is uncomfortable or impossible to listen to, then you’ll probably have to re-download the podcast and try again.

    audacity icon

    Bearing all that in mind, just how does one speed up a podcast? Easy: Audacity, an open-source audio program that’s packed with features, cross-platform, fairly simple to use, and of course, free. In fact, the program is most likely used in the actual production of many of the podcasts you’ll be modifying.

    Additionally, you’ll need the LAME mp3 encoder to save your processed files back to mp3 after Audacity is finished with them.

    Audacity also supports batch processing (called "Chains" in its parlance) that allows you to open multiple files, run filters, and save back to mp3 with just a couple of clicks. Not bad, but how’s it work with iTunes?

    In basic form, the workflow looks like this:

    1. Podcast is downloaded. MP3 file is saved into your iTunes Music > Podcast folder and the appropriate entry appears in iTunes’ Podcast panel.
    2. Said mp3 file is opened in Audacity. Modifications are made.
    3. New, faster mp3 file is exported.
    4. Original mp3 is replaced.
    5. iTunes entry is updated with a shorter playing time.
    6. Profit?

    Alright, now that we know what we’re in for, let’s walk through the procedure.

    Install and Configure Audacity with LAME mp3 encoder


    click to enlarge

    Download Audacity and LAME encoder for your system. Version 1.3 (beta) is required for batch/chain processing.

    Now to configure.

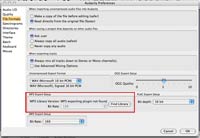
    Once Audacity is installed, we need to tell it where the LAME encoder is. So, launch the program and select the Preference menu item. Under the file formats section, choose "Find Library" next to MP3 Export Setup. Also, choose the bitrate to save your modified podcasts at. Most podcasts are published between 64kbps and 128kbps. In my experience, 64kbps provides sufficient quality for listening to spoken word, though you should adjust it to fit your preference.

    Next, we just need to set up a Chain. Chains are like scripts inside Audacity that automate a string of operations. For our purpose, we need to build a chain that imports the mp3, changes the tempo, and re-encodes it back to mp3. It’s really easy, so let’s get it set up.


    click to enlarge
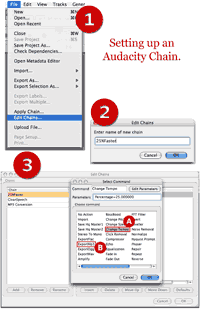
    1. From the File menu, select "Edit Chains." You’ll be presented with a box showing the pre-configured Chains.
    2. Click "Add" and give the Chain a name (ex: 25%Faster)
    3. Then click "Insert" to add a step to the process. You don’t need to tell the Chain to import a file. That happens automatically when you run it. So the first thing to do is select "Change Tempo" not Change Speed. Change Speed will affect the pitch of the audio, like speeding up a cassette tape or turntable (aka "chipmunking"). Change Tempo leaves the pitch as it is.
    4. In the Parameters field, enter to amount to speed up by. 20% will result in 48 seconds for every 60. 200% will result in 30 seconds for every 60.
    5. Next, click Insert again and select "ExportMP3." That will complete the Chain.
    6. At this point, you can create multiple Chains for different speeds if you want. One for 15%. One for 50%, etc. When you’re done, close the Chains window.

    Two steps, that’s it. Change tempo -> ExportMP3.

    Let’s Get Speedin’

    Now that Audacity is all set up, we can do the actual processing.

    1. From the File menu, select "Apply Chain" and select the one you created earlier. Click "Apply to files."
    2. Navigate to where your podcast files are stored. Unless you’ve changed your iTunes settings, they’ll be in your "iTunes Music" folder, in a folder called "Podcasts."
    3. Select the files you want to speed up. On a Mac, hold down the Command/Apple key to select more than one file. On Windows, use the Control key.
    4. Click "Open." Audacity will begin processing the files. When it’s finished, you’ll see a folder called "cleaned" with your originally downloaded files. Inside that folder is your shiny new faster podcasts.
    5. Move the new files out of the "cleaned" folder. When asked if you want to over-write the existing files, say yes.
      IMPORTANT: If you want the option of re-processing the files at a different rate, copy or duplicate (don’t just move) them to another folder before replacing.
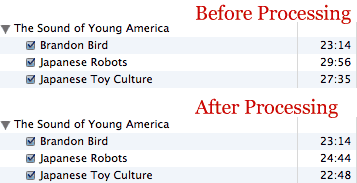
    6. Open iTunes and click on Podcasts from the source view. Select the episode that you modified. The time should change, but if it doesn’t, get info on it. That will force iTunes to refresh the display.

    podcast before and after

    Ta-da. Welcome to the world of faster podcast listening. The next time your iPod is updated, the new faster podcasts will be copied and you can take them on the road.

    In defense of digital music files

    Volkher at livingwithmusic posted the other day a rather thoughtful treatise against digital music files as a medium. He does a good job of bringing up all the relative shortcomings of abandoning physical media, including the effort required to encode/download and properly organize/tag files as well as the burden and cost that goes into storage and preventative backups. And he’s right on the money about picking an audio format that may or may not be around for the long haul.

    It’s a valid argument; you should go read it. But as one of those “young folks” who’s been living with mp3s and related files for 10 years now, I’d like to offer a friendly rebuttal, because digital music files do have much to offer, despite the occasional hassle.

    Firstly though, I’m going to side-step rights-management and other DRM-related issues. It’s quite possible to build a large collection of digital music and never touch the stuff. Plus, with all the talk lately about eliminating DRM from the marketplace entirely, it may well not be an issue in the near future.

    Carrying on then, why embrace digital music? In my case, the number one reason is convenience and flexibility. Using iTunes, it only takes a handful of clicks to set up a playlist that will last all day. That playlist will only include songs that I like, ignoring ones that I might not care for. I can listen to one hundred different artists as easily as I can listen to Radiohead’s complete discography, including live shows and unofficial tracks. No need to organize or hunt for physical CDs, or interrupt the music to change discs or skip ill-favored songs.

    With some extra up-front effort and Smart Playlists, I can turn my library into a self-refreshing and randomized jukebox that I can assume control of at any moment. With an iPod, I can take it all with me, wherever I go. It truly is awesome stuff.

    Another reason I enjoy digital music is the physical space savings. I still have a large number of CDs, even though the vast majority of my music listening is done via iPod or iTunes. Finding a place to put all of those discs has proved challenging and, after 19 months of living at my current house, most of them are still boxed up and hard to access. That’s fine though; they can stay in the garage/closet/attic because I already have everything I need on my hard drive.

    Additionally, expandability is a significant motivation for taking to digital music. As a physical collection grows, the tyranny of the shelf kicks in, which ultimately limits the collection’s size and imposes increased time-overhead on organization and media retrieval. iTunes offers no practical limit to the number of songs it can manage. Hard drive space and memory are the only true limitations (though a computer’s processor speed can become an issue, especially if there are a large number of live-updating Smart Playlists). Currently, I’m storing about 18,000 files (between my library and my wife’s) + a backup drive in the same physical space as about 6 CDs. I could double the amount of songs and hardly use any more desk space.

    Of course, this digital utopia is not without its pitfalls, many of which Volkher mentioned. Number one, by far, is data security and integrity. Hard disk drives are notorious for failing, whether though a mechanical fault or corrupted disk header. And they usually fail inexplicably and at exactly the wrong moment.

    A hard drive crash can obliterate a library of thousands in an instant, often with no warning whatsoever. I know; it’s happened to me on multiple occasions. By contrast, a scratched CD might lead to the loss of that CD and nothing more.

    Thus, a workable, redundant backup system is necessary to protect against irrevocable and irrecoverable catastrophe. The cost and effort of doing that, of course, increases with the amount of data to be backed up. A 10GB library is easier to deal with than a 100GB.

    In his post, Volkher posits a figure of one terabyte of digital music, once all is said and done and a large collection is encoded and/or downloaded. But is that a meaningful gauge? Just how much music will fit in a terabyte?*

    • At 128kbps, the bitrate of standard iTunes-purchased AAC files, one terabyte is 18,641.35 hours / 776.73 days / 2.12 years of non-stop, continuous music listening.
    • At 191kbps, the average bitrate in my library, one terabyte is 12,492.63 hours / 520.53 days / 17.1 months of continuous listening. That number is about 11 times the size of my current library.
    • Suppose you’re a true audiophile and only deal with lossless encoding, such as FLAC or Apple Lossless format. The average bitrate of all the lossless songs in my library is 728kbps, which is still nearly 3,277.6 hours / 136.6 days / 4.48 months worth of continuous audio.

    *these numbers do not take into account file overhead, album art, etc. However, it seems pretty clear that one terabyte will hold a lot of music.

    You’d have to own a seriously HUGE collection (roughly 4000 full-length CDs, lossless compression; 7500 CDs, extreme quality 320kbps mp3s) before a terabyte is a serious option for the working copy of your library. I know there are people who can claim those numbers, just not the vast, vast majority of music listeners.

    Heck, I consider myself a respectable avid collector/listener/explorer of music and it took me a full year to listen to each and every song in my library, a library that is the equivalent of ~1400 full-length records.

    Hard disk storage is cheap and getting cheaper. Practically speaking, two 500GB drives would sufficiently provide enough storage for a live copy and backup of all but the most copious of collections. Add a third for redundancy, if you’re paranoid. At $230 a piece as I write this, the cost of the drives compares favorably to all the shelving and organizational furnishings needed to manage a large physical collection, even those from IKEA.

    Which brings me back to physical space savings: how does one translate a digital library into a physical space? Let’s use numbers from my library to hazard a guess. A trusty ruler tells me that a standard CD jewel case measures 11mm thick: a “CD unit” for this purpose. FreeDB tells me that the median number of songs per CD is 12 (with an average of 13). Therefore, I can estimate that each song on a CD takes up .917mm of physical space. Applied to iTunes, the 14,554 songs in my library would use up the equivalent of 1443 “CD units” or 15,872mm or 52.1 feet of “shelf space.”

    That number is based on the assumption that a digital library consists entirely of full CDs. When considering partial albums and single tracks, the space savings is even greater. The single track of Nate Dogg and Warren G’s Regulate in my library actually saves me the full 11mm of space rather than .917, since I don’t have to own the full album just to have that one song.

    Despite my continued devotion to the digital music scheme, I must admit that I do miss some of the concrete and tactile aspects of handling a physical record or compact disc: album art, liner notes the satisfactory “click” of snapping a disc into place and-contrary to what I’ve said above-the awesome feeling of standing back and viewing a neatly organized array of records on shelf after shelf. But at this point, for me, it’s all digital and there’s no going back.

    Volkher goes on to discuss the inherent uncertainty of choosing an audio file format that may or may not be in use and supported by audio devices in times past the immediate future. And he’s got a valid point. I know from experience. Long ago, a portion of my digital music collection was in the MP2 format, which was largely made defunct by the growth of MP3 tools and players. The death knell for me was the iPod. I was dismayed when I bought my first one and discovered that it didn’t support MP2, forcing me to convert those portions of my library into something more usable.

    So futureproofing is an ever-present concern. But, like the compact disc and vinyl record, there’s no reason to believe that mass-market digital formats won’t be around for a very long time. The use of MP2 was never really widespread. MP3 and AAC however have users in the tens of millions. Many people and many companies have invested a lot of resources into those formats. They’re not going to die any time soon. In fact, the patents on the MP3 format begin to expire in 2011, just 4 years away. I’d wager that individuals, corporations and open source communities will have a field day with it in short order, continuing to breathe life and support into software and hardware for decades.

    Look at the passion with which gamers and code archivists continue to resurrect, port and support obsolete games. Just yesterday I ran across a 30+ year old command-line game called Super Star Trek that certainly would not be playable on today’s technology. But thanks to the efforts of a dedicated user, there is now a refreshed version for Mac OS X, Windows, Linux, OS/2 and DOS.

    Likewise, I expect that in three decades time, I will fully be able to enjoy my collection, no matter what size it has expanded to. I believe that the flexible nature of software will make it easier to maintain support for these formats as they age, unlike hardware-dependent media (I’m looking at you, reel-to-reel, 8-track and increasingly, cassette tapes).

    The fact that I was able to easily convert my MP2 files to MP3 is a strong argument for digital files. Just try converting a reel-to-reel tape without a reel-to-reel player.

    I admire Volkher’s decision to keep his music in the real world; I know there’s no better feeling than finding an old, rare, long-sought-after gem. But for me, the future is all digital. It has its trappings, but they are easy to overcome. The rewards outwiegh the risks.

    So, now if you’ll excuse me, I have a playlist to build.
    mp3 waveform

    Cue hard drive failure… Now

    Like clockwork, each January means the end of Christmas decorations, the onset of the full desolation of winter, learning the motor-memory of writing a new year and, of course, a sudden, massive hard drive failure. Every year since 2001 it has happened to me, always to my external music drive and always in January.

    It’s quite comical, if you have the right sense of humor.

    Then it should not have been a surprise to me that, once again, right on schedule, my music drive crashed last night. I was politely updating my iPod, having devised a new experimental listening scheme for the new year. As it would take several minutes to copy the several thousand songs, I decided to have a quick shower.

    When I returned, I found my desktop in an unusual state. iTunes was no longer running. Mail and Safari were quit as well. The three FireWire volumes that I normally have mounted (including the music one) were missing and LaunchBar’s command area was active, as if the computer had been restarted.

    I had no idea what caused that state of affairs, and still don’t. But I sensed danger, so I decided to do my own restart, which went smoothly enough. Until it was time for the external drives to mount. Two of them did; one of them didn’t and I’ll let you guess which one.

    Disk Utility was of no help, failing immediately. It could see the drive, but attempting repair resulted in a message similar to “The underlying task failed on exit.” Whatever the problem was, the drive’s directory looked like it was in bad shape. Fortunately there is a god whose name is DiskWarrior. This diagnostic deity has raised many drives from the dead and after a few minutes, he had raised one more, rescuing my music from binary oblivion.

    From there, the iPod update went well, other than about 40 songs that did not make it back from Hades. However, having gotten accustomed to these failures, I’ve become the king of backups. Twice nightly, Synk, the handiest little backup program I know, copies my music volume and other important data to a dedicated backup disk. Some quick drags-and-drops and even those handfuls of missing files were replaced.

    Though I still don’t have a clue what caused the malfunction, I gotta say that the experience really wasn’t that bad. Much better than past years. However, despite all my preparations, this is one New Year’s tradition I would rather not repeat.

    And even though I didn’t have to make full use of mine, remember that lesson kids: Backup Backup Backup.

    Clean up your Composer tags already!

    Update: The revised sorting feature/problem in iTunes 7.3 and later renders portions of this advice useless. Some of it still applies for Smart Playlist building, but the segregated sorting no longer works. If you’re using a version prior to 7.3, go nuts. If you’re using 7.3 or later, be warned.

    In striving for zen-like simplicity while maintaining and extending the usability of iTunes, please follow me as I introduce you to the technique I use to keep my Composer tags orderly and navigable particularly when using an iPod. The idea is to streamline the presentation of the tags while adding meaning to them.

    In my library there are three types of songs that require use of the composer tag:

    1. Classical and other so-called “serious music”
      Principally includes all works by traditionally-recognized composers and performed by orchestras, quartets, etc. Also includes film and television recordings that are not the originals, such as when the Royal Philharmonic plays Star Trek or Trotter Trio’s jazz CD Sketches on Star Wars.
    2. Cover songs
      Whether live or in studio, remakes or performances of songs that were originally recorded and released by another artist or group.
    3. Remix Albums
      Collections of remixes of other artists’ songs released under the marquee of the remixer. For example: Fila Brazillia’s Brazilification.

    If a song in my library doesn’t belong to one of those categories, the composer tag is left empty, completely blank. There’s no need to use the tag in the pop/rock idiom; all the relevant info is contained in the song-artist-album structure.

    The same goes for movie scores and other “Original Motion Picture Soundtracks.” It’s redundant to put “John Williams” in both the artist and composer when it’s his recording of the original release of the album that you’re tagging.

    Some people are tempted to put the songwriter in the Composer space and CDDB/Gracenote often includes it when retrieving a CD.

    Well, don’t. And if you already have, delete it.

    How likely are you to go to the Composer field and select “Cobain, Kurt” when you want to hear Heart-shaped Box? Not very, I’m sure. You are much more likely to select “Nirvana” from the Artist field. If you must obsessively keep that info, put it in the Comments field. That way you can still find it in your Encyclopedia iTunica if you need it, but it won’t get in the way of using your iPod.

    So how do we keep these styles from intermingling, so that you don’t end up with Guns n’ Roses next to Gustav Mahler?

    It’s rather easy; just add leading character to the beginning of your composer text based on the type of file it is, particularly if a song does not fall into the Classical category.

    In my scheme, classical music takes priority, as it is the format that best benefits from using the field. In these cases, the composer is, well, the composer. Syntax is up to you: Mahler; Gustav Mahler; Mahler, Gustav; however you see fit to do it.

    Likewise for film and tv music that’s not from the original release. I treat those recordings the same as classical. The Artist tag goes to the ensemble performing the work while the original composer gets credit in the Composer tag.

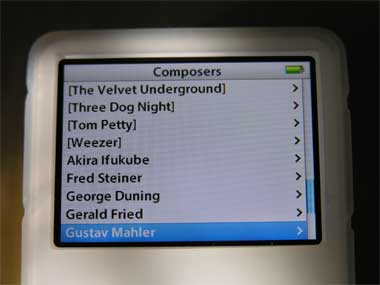
    ipod plays composer tags with brackets for cover tunes

    Cover Tunes

    With cover tunes, the original performer’s name is surrounded by brackets [ ]. So when The Cardigans play a Black Sabbath song Iron Man, the Composer tag looks like this [Black Sabbath]. Now all the cover songs are sorted alphabetically together on the iPod. Plus, I can create a Smart Playlist with condition Composer starts with [ and have all of them gathered in a single spot. If new cover tunes get added in the future, they’re automatically included in the Smart Playlist.


    Cover tunes smart playlist. Click to see larger version.

    Finally, there’s remix albums. There’s a long discussion to be had about how to treat those with iTunes.

    Hopefully, these suggestions are helpful and will assist in taking full advantage of iTunes’/iPod’s power.